In Part 1: How to Measure Yourself for a Corset, I spoke briefly about what measurements to take for making a corset. In this part I will show you how to apply them to a pattern.
There are several ways and methods of adjusting patterns; using a commercial pattern, online free downloadable pattern and by finally drafting the pattern yourself. But first, you have to select a style of corset to make. My client, for this series, is none other than The Head of the Seamstress’ Guild and famed author of the Young Wizards series herself, Diane Duane! [Kermit the frog happy dance] Ms Duane first saw and fell in love with an underbust by Royal Black Couture (fig 1) based upon a pattern by L.H. Foy (fig 2).
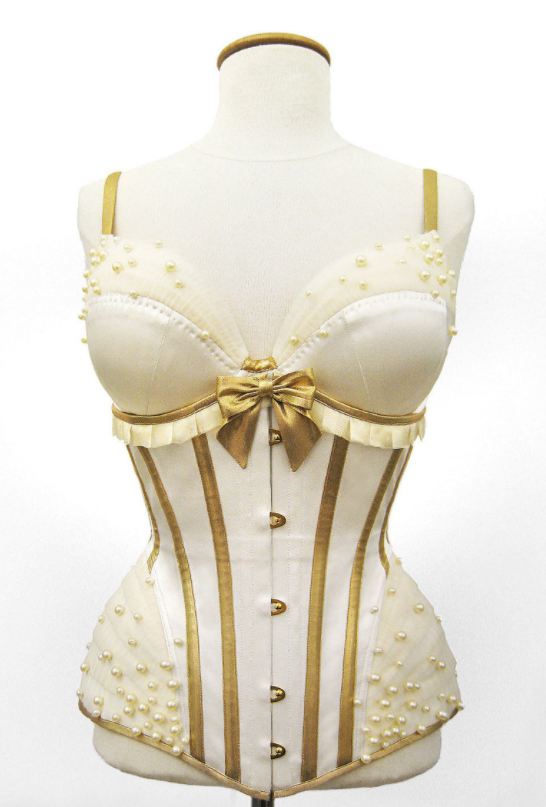
fig 1 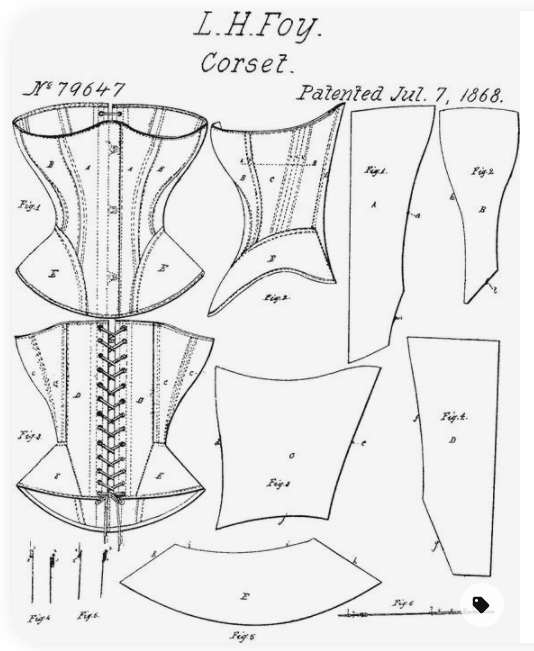
fig 2
For the purpose of this series, I will show you how to pattern and fit an overbust corset and then how to turn the overbust into an underbust. The Foy is one of my favourite designs for people who tend to wear corsets only on special occasions. It is incredibly comfortable in that while it is tight into the waist and supportive of the bust, the hips are softer and allow greater freedom of movement. In the words of another client whom I made a similar corset for some years ago, “These hips flaps ROCK!”
Ok, now to start on my research. Is there a commercial pattern out there that recreates the Foy? After all, no point in recreating the wheel. If someone has been kind enough to do the hard work for me there is no shame at all in starting there. Short answer, no (2015). Bummer.
So, plan B. Is there a commercial pattern out there that is close? I found two; a simple Victorian corset that I would have to modify to include the Foy hip pieces, a free online pattern by Ralph Pink that has a slightly more stylised bust. The Ralph Pink pattern would require the minimum amount of redrafting – or so first I thought. This led me to the universally suffered ordeal of the corset maker, alter a good pattern, waste hours and even days on a bad pattern, or give up and draft my own? For me, drafting is a lot less hassle and faster as I have decades of experience under my belt (4 to be precise). But most sewers will start with either a commercial pattern or one they’ve downloaded from the interwebs. In the process of taking you through all three, I will hopefully show you the pros and cons of the Good, the Bad and the Ugly.
BUT FIRST!!!!!!
Creating a pattern or any piece of art is about the drafts. With sewing, every stage is a redraw to get closer to the thing in your head. With the initial draft, it is one stage, toile and fitting another stage, cutting the fabric yet another stage and sewing the layers of a corset, each one yet more stages refining your pattern/fit. At each stage, there is never enough attention to detail. Excellent fit and amazing corsets take time. SO, TAKE YOUR TIME. And remember, doing the adjustments to any pattern now is NOT the final pattern. This is the first draft. AND! This series is for a live set of lectures I will be giving at Discworld Con in August (2016)! Also look for the #dwcon on Instagram, Twitter and Facebook for more, almost daily updates!
Sh*t You Need to Understand
Negative Ease.
Ease is the space between the body and the article of clothing which allows or does not allow ease of movement. Things like trousers and oxford shirts have an ease of 2 inches between skin and cloth. Coats will have 4 to allow for other layers of clothing to be worn between. Articles of clothing like yoga pants, underwear and swimsuits will have negative ease. This is where the article is smaller than the dimensions of the body and is usually made of fabrics that stretch so the items clings and hug the body. So, a corset uses negative ease with non-stretch fabrics to force the body into a shape. Now you can find out exactly how much negative ease a pattern has at the main measuring points (bust, underbust, waist, hips) by taking a tape and measuring in between the seam allowances (if there are any on the pattern) and adding them up. Then subtract that measurement from both the pattern’s definition of what that size is via their chart and also to your measurements. The greater the negative ease, the greater the discomfort. So don’t get ridiculous on your first corset and go for a 4″/10cm overall reduction unless you are used to the effects. A good and comfortable reduction to start with is 2″/5cm on bust and waist and 0 ease or skin-tight on the hips.
Seam Allowance
Seam allowance on a corset pattern (or if you add one) should be 1cm or the width of your sewing foot to the edge of the material. This becomes important later but take note if there is seam allowance on your pattern when you are redrafting and checking your reductions.
Corset Height
A too short corset is one that creates nip-slip opportunities, back wings, spillover at the sides and unexpected spare tires. People often check the waist reduction on their corset measurements but forget the height and wind up with a disaster. You need a pattern with at minimum the waistline marked on it. You will need to either lengthen or shorten sections of the pattern according to measurements you have taken in Part 1. The most often committed mistake on patterns is that the length between underbust and bust is never high enough. It takes a lot of paper and tape but being able to customise the height of each vertical section is what makes good fit. Be sure what you do to one pattern piece you do to all others.
The first set of images, using Butterick B4254 view C, shows that I have lengthened the pattern from the waist to the hip. I have also chosen a smaller size of waist to bust and to flare out the hip line to the next size up.
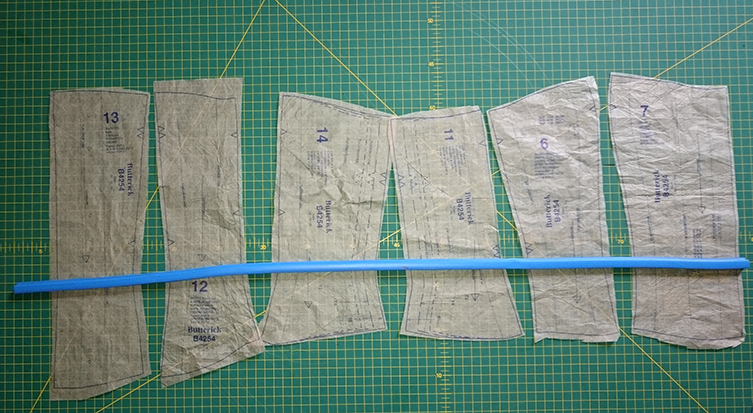
fig 4 – waist line 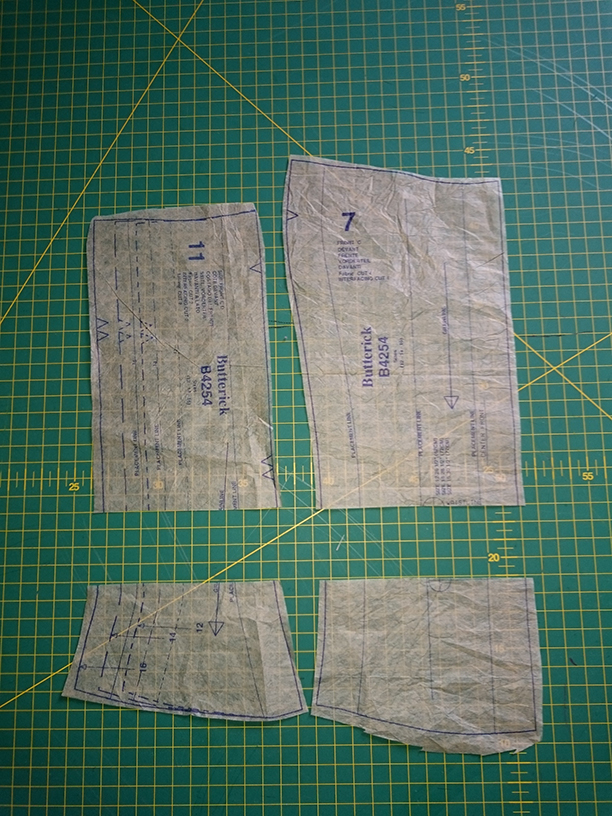
fig 5 – cut to lengthen 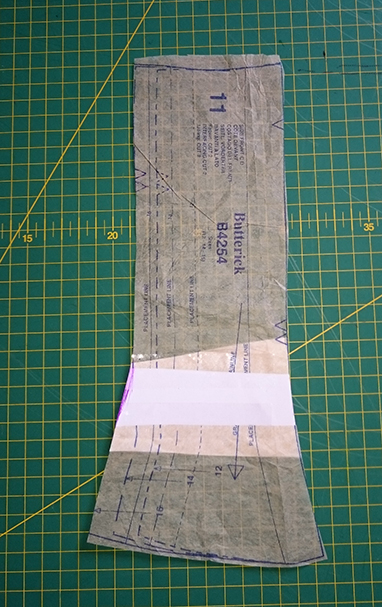
fig 6 – lengthened
In this next set of photos, I have cut the front panel, fig 7, at the waistline. Next, shortened the waist to hip line by overlapping the cut pattern pieces. Then I bisected the pattern down the vertical parallel to the grain line. I then made the front hip area narrower and the bust fuller. To adjust the waist to the underbust length you will need to *find* the underbust and bust lines on the pattern. Unfortunately you often either have do this by eye or by making a mock-up of the patter in paper or cloth to see how the pattern lines up. I will cover this method in The Bad.
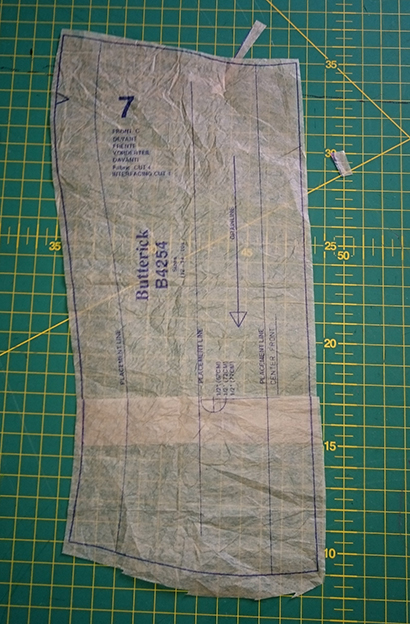
fig 7 – shortened 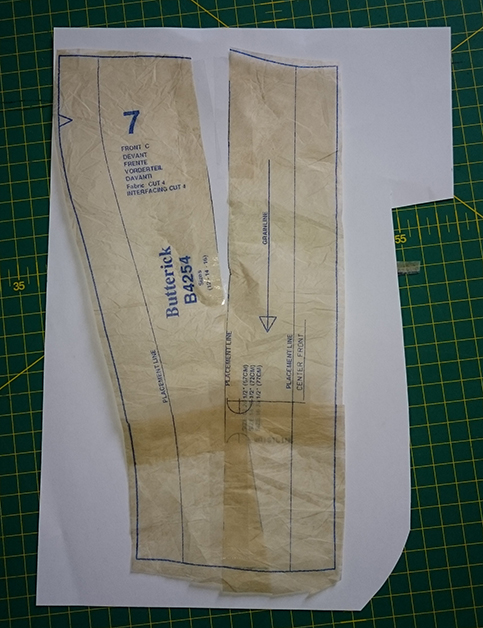
fig 8 – split along grain line 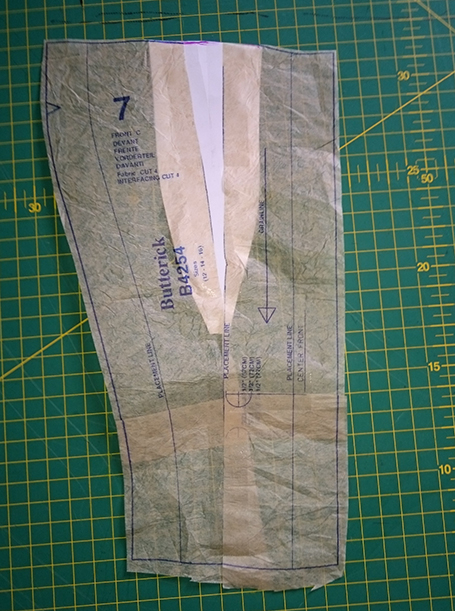
fig 9 – pieced
TIP: Make sure you check the waist to underarm length and make sure it goes all the way up! You can take off the excess at the next stage, but you can’t put it back on.
Back Gap
When you are checking the reduction in a corset pattern be sure that the back gap actually does what it says on the package. If the gap is more than 4″/10cm it will not fit!!! It won’t just not fit it will do bad things to you and be horribly painful. And here’s why…Narrow placement of steel bones in the back keeps the lacing from buckling and the steels parallel which is crucial to comfort. There are many who recommend a 4″/10cm gap for corsets, but this is never good.
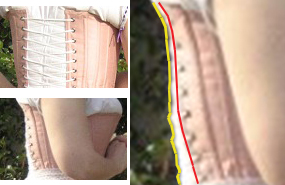
fig 9 – How the bones buckle and skew when misplaced.
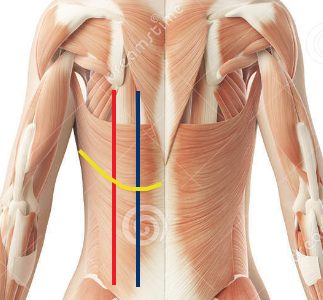
fig 10 – the back 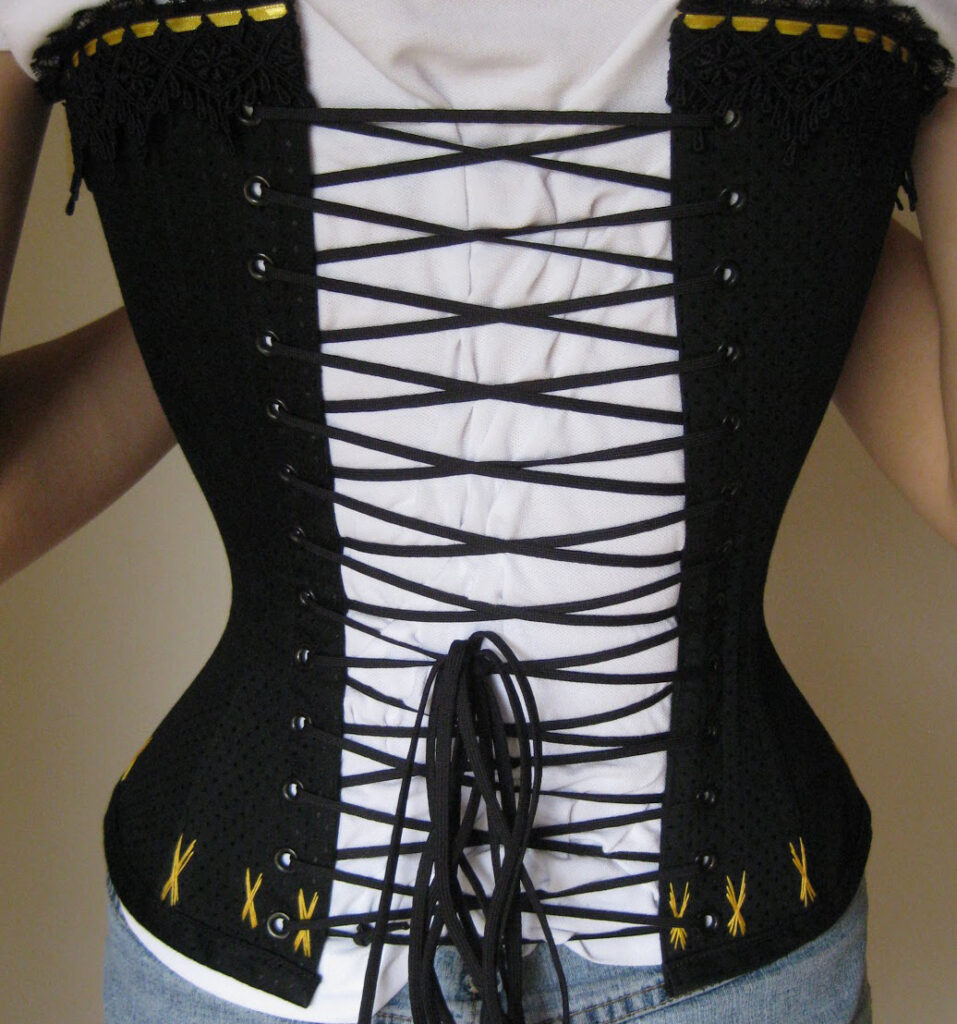
fig 11 – way too wide
In figure 10, it shows that the muscles of the back curve towards the spine (the yellow line) and the muscle structure underneath. What you need to know is that the steels for the lacing holes must be INSIDE the curve closest to the spine (the blue line). When you have too wide of a gap as seen in figures 9 & 11 you can see the placement is on the outside of the raised muscle (the red line). There are several problems with this:
- The top of the steels will be rubbing against the shoulder blades and causing irritation (bruising and red sore areas) and restriction of movement.
- The bottom half of the steels are directly above and compressing the kidneys. This will also cause acute lower back pain as the steels are not supporting the spinal column but putting pressure on the muscles supporting the spinal column making them work harder.
- Not only are the steels on top of the kidneys but the end of each steel is poised to dig into and rub on top of the sciatic nerve. This expalins why some corset wearers can get “dead leg” or screaming sciatica. Thank you to Aleksandra Bromblik for adding this tip!!!
- Because the lacing holes are on the other side of the muscle ridge the laces will be cutting into the muscle. See fig 9 yellow line. The red line is the edge of the corset.
- Because the gap is so large the foundation layer is NOT being a foundation to achieve the shape and support of the corset – the laces are doing that job. And the stress that puts on the steels that they weren’t meant to take THEN warp and twist (fig 10 red line), aggravating points 2 & 3.
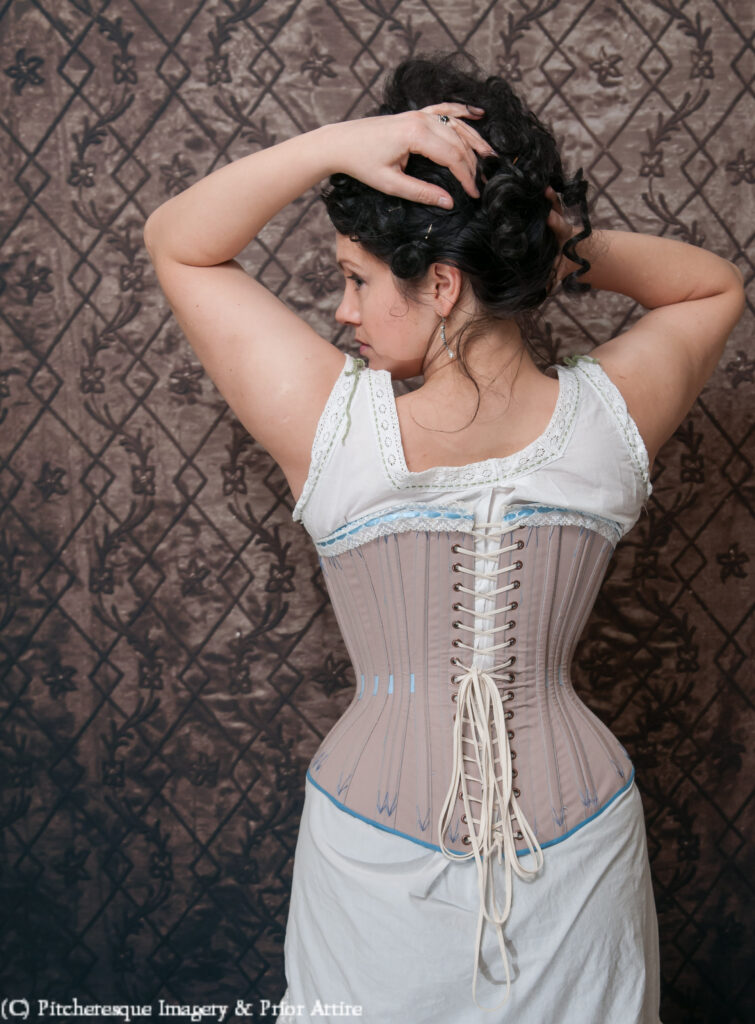
Now there is a point to make about size. A petite figure will require a smaller gap. It should never be more than two inches. That is also NOT saying that a larger frame can take a greater gap. When drafting your pattern and fitting the toile – MAKE SURE the steels are, at the very least, on top of the muscle ridge and NO FURTHER APPART – regardless of the number of inches. Below is an example of a perfect gap showing even spacing and distribution of foundation. The corset is by Izabela Pitcher of Prior Attire and the example is from A Damsel in this Dress.
THE GOOD
I’m using for this example Butterick Patterns B4254 Size Misses Stays and Corsets and the Long-line pattern from Scarlet of Corset Training.net (as above). They top the list of what makes a good commercial pattern.
- Their size chart is accurate to their measurements and are clearly stated on the packaging/web info.
- The pattern is not scaled but shows the adjustments for each size. It’s great when they show the adjustments for each size on each piece.
- The waistlines are marked clearly on the pattern. With the Butterick pattern, the waistline is on the front and back pieces. Using a flexible curve you can line the patterns up by arrows, using the grain lines to ensure the pattern is in alignment, and mark in the waistline on all the pieces (fig 13). Fig 3 is of the front pieces of a long-line corset by Scarlet. This is a pattern which is 1/4 or 1/2 scale. You use pattern graph paper in cm to enlarge the 1/2 scale pattern into full-size pieces. Hey presto, basic pattern blocks! Not to be confused with a “scaled pattern” which is a pattern which is just enlarged all over evenly to make it larger for a larger size. Will explain why that is bad further on. Scarlet’s pattern very helpfully gives all the major measurement points on each piece.
THE BAD
What makes a pattern bad? In web design, we learn good design by looking at bad sites (WebPagesThatSuck.com). So here I will show you a “bad” pattern.

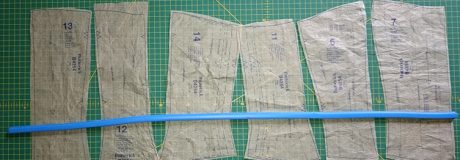
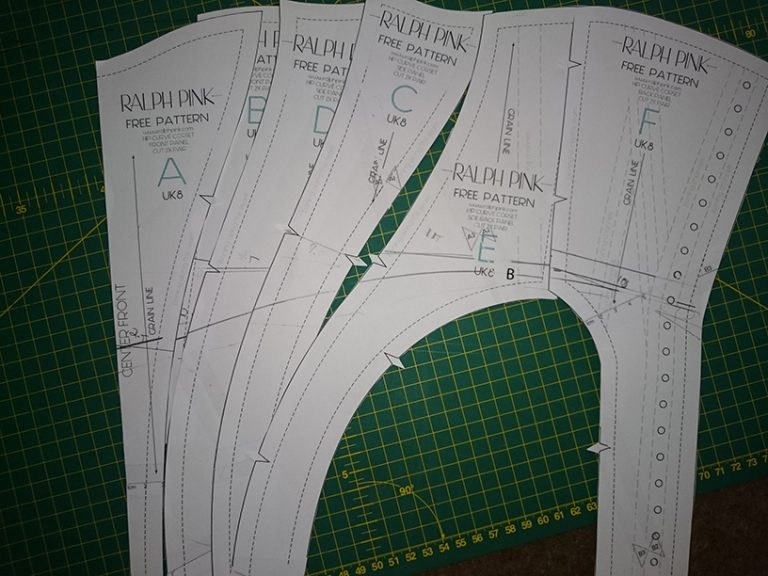
Ralph Pink has designed a twist on the classic Foy with a lovely bust treatment. Would make a lovely pattern to work with except for the following massive headaches. As you saw in the good pattern, waistlines were marked. This is crucial if you have an unusual pattern to have that line of reference throughout the pieces. It also means that when you lengthen the pattern, it is consistent. No waistline on the free pattern. So, I spent £15 of my own money to check the professionally made commercial version. Nope. No waistline there either. In order to place the waistline on a pattern that does not have one, line up the pattern pieces, matching arrows (matching lines drawn on the pattern). As this is a Foy, the waistline is most noticeable at the hip. So, using a french curve or flexible curve, align the curve 1cm above the seam allowance.
The waist is NOT a straight line around the body, it is NOT a circle, it IS an oval and will appear curved on a flat pattern. The waist at a person’s hip will be the highest point in the curve (it just is, it’s how your knickers stay on.) So if you take that point directly above the hip at the side seam and then gently curve to where you “guess” the waist and match it toward the back. That should give you a pretty close waistline where to cut. To check for accuracy, you can make a second guess at to where the underbust line is and using your measurements from Part 1 check the accuracy of the waistline. You can see I have done this below but Charlie insisted on helping.

This makes for a lot of guessing which will not ensure success. The resultant curve “felt” wrong. There is NOTHING worse than f*cking up a project for a client you wish to impress the socks off of (as she has so often impressed the socks off of me!) And when the client is only you, you too deserve the best. One of the ways to place a waist, bust and hip line is if you assemble the pieces making a mock up and check it on a live body. Pretty bloody difficult if it is you by yourself and the pattern requires a lot of adjustment. Luckily, I have “Matilda” my live in nudist model. I cut out the pieces for one half and then “fitted” the corset to Matilda. There was a lot of blue tac involved. This showed a number of problems:
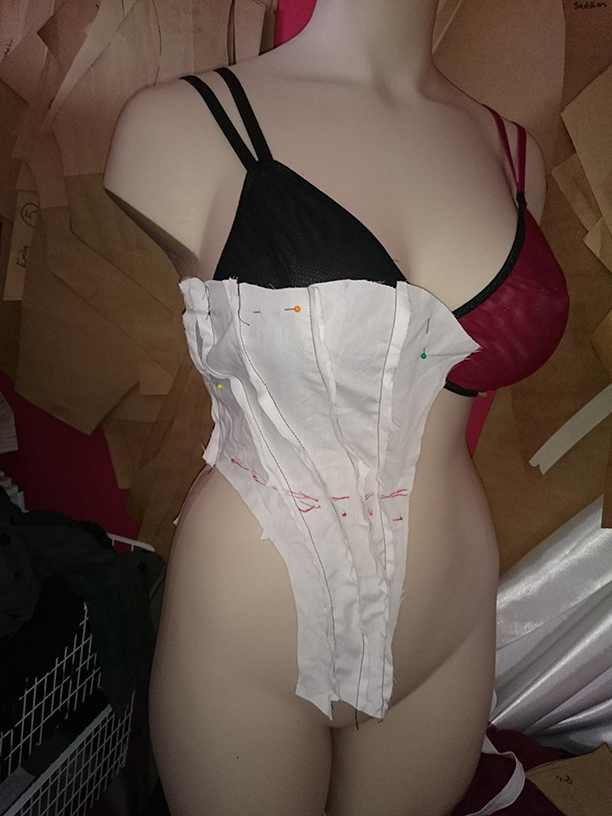
- The actual waistline as found on Matilda was different from the “guessed” curve. The guessed line is shown on fig 16 is the pencil line and the fitted line are the red dots. I fitted the mock-up onto Matilda’s waist at the side seam. It is essential that you use the side seam as your anchor point in fitting. When laced, the side seam should match the body’s lateral (or side) line.
- When fitting on Matilda who has a gI-nor-mouse chest (36 G – not your average size UK 8 which is the free version of the pattern) – the front bustline was loose and the overlapped at the front seam by at least an inch. The back was narrow, there were at least 5″/12.5cm left bare. As I had fitted the side seam to Matilda’s side seam I would expect that the front would be slightly off centre being not wide enough because of negative ease and the same with the back. In fact about an 1-2″/5-10cm each. But the back had a 5″/12.5cm gap – on a corset pattern that supposedly is a closed-back, no gap pattern…
- The length between the underbust and the bust lines are is very short. As you can see on Matilda, the side seam is almost a perfect length fit, considering seam allowance. But the bust line does not rise to cover the bust in a meaningful way. This is not practical as the first time the client raises her arms, the whole world will get an unexpected, if greatly appreciated, show…
- The sizing is very confusing. Matilda is not an ideal creature to fit as her measurements are, well, not human. They are on the other hand a size UK 16. Being too generous in the front and nothing on the back on a 16, makes this very fishy if I am trying to redraft an 8. On further research, the Ralph Pink sizing chart does not actually match any of the standard UK charts (at time of writing 2016). I did some more research and made comparisons to Asos and Marks and Sparks size charts and the RP chart was off by typically on average 2 inches smaller for each measurement for the UK 8. Which begs even more confusion, if the size would be too small for a normal UK 8 then why was it so big on a UK 16?
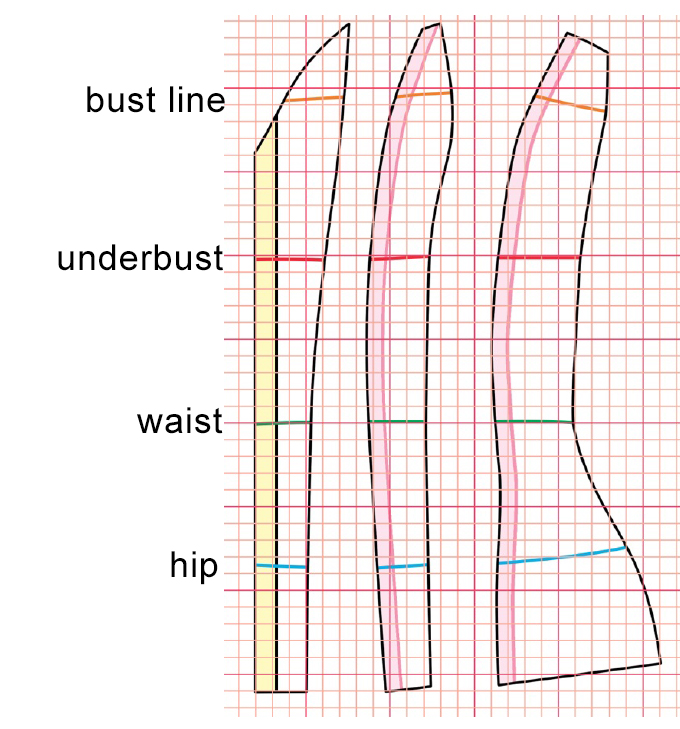
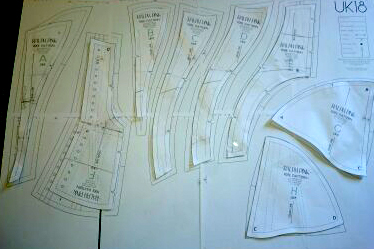
- Because I had shelled out for the pattern, I decided to check how the different sizes (the pattern included sizes UK 4-20) worked. To my disappointment, I discovered that they were scaled. There are some constants in body typing, for example, in most women, the hip line is 9 inches below the waistline. But, when you go up the sizes you will get wider hips, fuller busts, etc. A good commercial pattern, as we saw in figure 11, will keep the same hip to waist height or only change it a very little between sizes. A Bad pattern will scale proportionally; just get bigger evenly all over. As you can see in the image below, I laid the UK 8 pieces directly on top of the UK 18 pieces. That’s a 5 (10) size difference. The 18 is just bigger, no details of body type, size or fit considered. No consideration to the fact that in the larger sizes (16+) women’s front halves have a tendency to be fuller and their backs smaller. The only significant difference on the 18 is a higher bust line on the front centrepiece.
The amount of work I will have to make this pattern work is ridiculous. It would be easier and faster to hand draft the damned thing. So, onto The Ugly.
THE UGLY
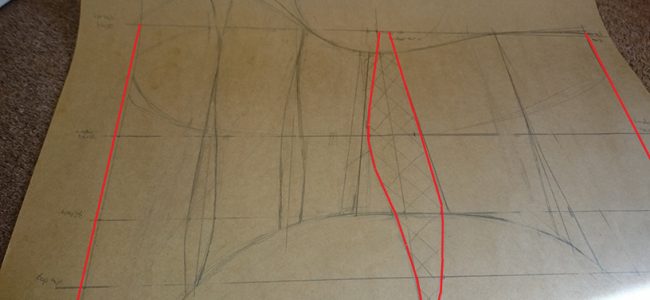
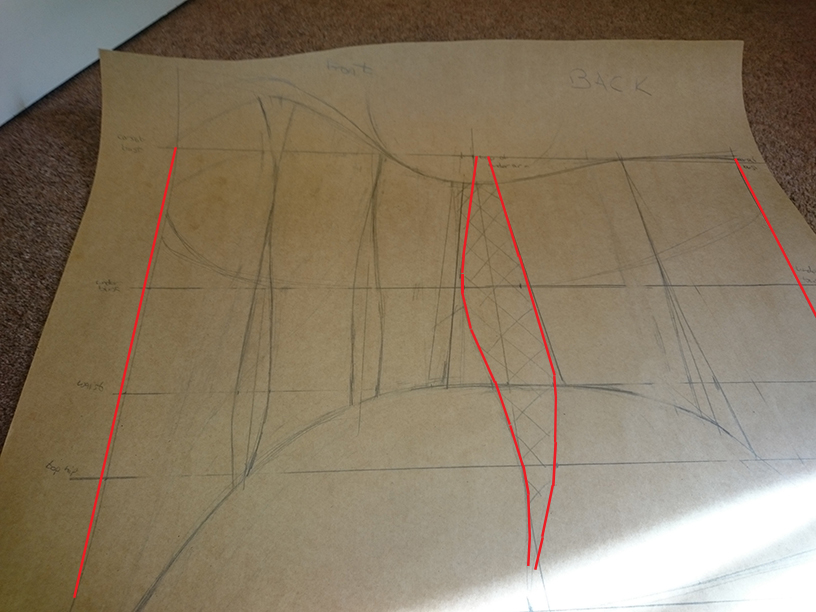
Why ugly? Because the artist is never satisfied with their creation. Hand drafting a pattern takes experience, guts and a big rubber. Some prefer to use pattern paper which is a plastic-coated on one side graph paper where the squares are in either inches or centimetres. I find it overstimulating and prefer plain pattern paper or butchers paper. Just my personal preference. In the drawing below I began by using a T-square to draw what would become the centre front line.

Then I added, again with the T-square to get perfect 90 degree angles the waist, hip, underbust and bust lines. To those lines, I divided each of the front measurements from Part 1 by 2 and marked the points on the corresponding lines. I then drew in the curves from one point to the next. I repeated the procedure for the back using the same lines. (fig 18 lines in red)
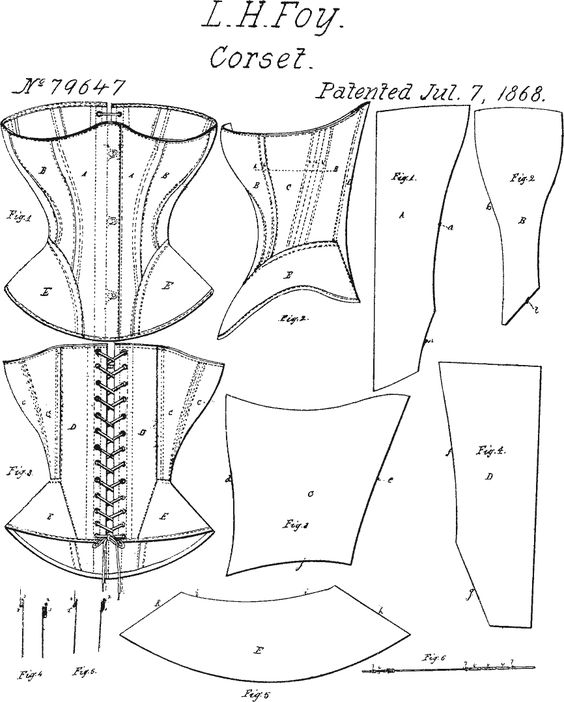
I then stared at the original Foy patent (fig 19) for hours getting comfortable with the pattern pieces and how they fit together and then began deciding where I would take the reductions from.
If you remember from Part 1, the bust is lifted to be even with the top of the underarm putting the nipple on the SAME LINE as the top of the underarm. This means if you leave the top of the pattern on that line and don’t draw the top of the corset above that point, you will be just resting the lower half of the breast in the corset and more than likely exposing the nipple. You want to keep the top of the underarm, at this stage, as high as possible. When you come to fit the toile you will make from this first draft pattern it will be easier to tailor the bust line through the underarm and to the back.
AGAIN! You can can take off the excess at the next stage, but you can’t put it back on.
Below is another reason why I like to call this state, The Ugly. There is the basic first draft that is going to allow me to create the toile. The toile, or mock-up, will allow me to get the elements into the right place on the client’s body and then adjust fit, height, reduction as need be. As you can see I combined the side pieces into one as in the Foy patent. I am not entirely happy with that as I prefer, again just my preference, to have that side seam as a visual clue for corset placement and it gives me another access point to adjust the reduction/fit. So I will probably be changing that.
REMEMBER! This is not a pattern yet! This is just the first draft so that you can make the toile and then the actual pattern. What I love about the design process is that everything is fluid right up until the finished product. Next step is to make the toile and I will cover that in Part 3 which will be a LIVE event (oh crap) held at DiscWorld Con (2016) at the end of August and hopefully recorded and uploaded to YouTube or some such after I stop drinking… BTW! If you happen to be at #dwcon and want to ask questions, I’ll be in the bar – mine’s a dry white wine! 😉 And if I remember correctly, so’s Diane’s.
Love Abi