I have been asked to give a lecture at DiscWorld Con in August 2016 on “Corset Fitting and Sewing Cheats”. As part of the build up to this lecture/demo I will have to prepare a veritable sh*tload of demonstration pieces to be displayed upon my CELEBRITY MODEL (Really, there is one and she said yes and everything!)! As I only have 50 minutes and there is a lot of tricks and cheats to this whole business (sorry to any other pro out there who thinks I am exposing “secretes”, but with the advance of YouTube I’d rather see people getting it right than all the schlock out there atm.) that start with how and what you measure. This will be the first of a series of articles made available here, both for the general public and the congoers (who will get first look and live demos with extras). Let’s start with a big misconception on corset fit itself. Below we have an illustration1 which shows the differences between the modern bustline wearing a modern bra and a TudorBethan or corseted bustline. The dotted line shows the top of the underarm, and as you can see the modern bust hangs a good two to three inches lower than a corseted bust. The corset compresses and lift the bust to on the same lateral line as the underarm. This holds true even for “cupped” corsets, the bust is lifted. Keep this in mind as we begin to take all the measurements.

Some other things to think about as we measure.
- Get a buddy – doing this on your own is a PAIN IN THE ARSE.
- Not all bodies are symmetrical so measure both sides. This will be essential to a comfortable corset.
- If you are nervous about knowing your actual measurements, measure in centimetres. Its a funny number that is just a number. Plus they are more accurate.
Disclaimer: This is not for the faint of heart! Or for the ready to wear corset trade. This is for those who wish to have a custom made corset, made by themselves or to provide accurate measurements long distance to a seamstress.
Download the Workbook PDF – corset measurements worksheet.pdf – with handy-dany extra columns for your measurements!
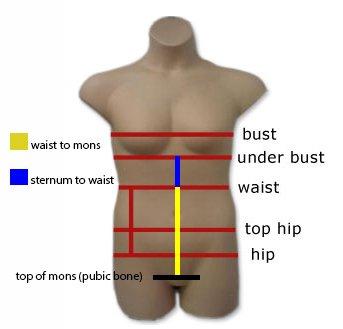
First start by finding your Natural Waist. No – it’s not at the top of your trousers.Take a long piece of string and hold it around your middle (usually at the height of your belly button). Now move your body bending from side to side. Allow the string to move into the crease at each side. Once the string settles, tie firmly, BUT NOT TOO TIGHTLY. You want accurate measurements. Tying the string very tight can boost your self esteem by appearing to have a smaller waist but will cause fit problems later on. IMPORTANT! Make sure that both feet are firmly planted an even distance apart. Uneven weight distribution will alter measurements. It may be how you stand now, but it wont be how you stand in a corset. For those with hip displacement or spinal issues, stand in your most usual and comfortable position.

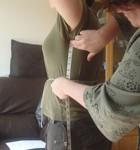
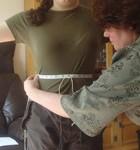
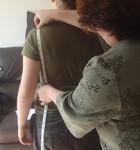
Find your Underbust. Normally when people measure for clothing the ask for the 360 full measurement. But is something this tailored we need to recognise that our front proportions are very different from our back. In corset making the underbust is a CRUCIAL anchor point for fit – you’ll see why as we progress. The easiest way to find your underbust is to use your bra.Take the measuring tape and pull it around your underbust (like in the picture). Now turning to the side make sure it is completely level! If you bra waves or rides up in the back – get ANOTHER piece of string and tie it firmly around your underbust. Use this in the following measurements.
Find your Median lines. This is centre front and centre back.

For the centre front. Take the point directly between the breast and drop a straight line down to the string at your waist. Mark that point on the string with either chalk or marker/pen. If the string easily moves out of place, then tie it a bit tighter and remark. You will want several measurements from this point. Underbust to the Waist: At the sternum from the bottom of your bra band to your waist.Neck to Underbust: For this use the hollow of your throat straight down to the point directly between your breast and the bottom of your bra band or underbust string.Note: check that they add up correctly by measuring the from the hollow of your throat to your waist. If they don’t it may be helpful to place a pin in your bra at the underbust as a marker.
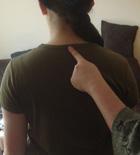
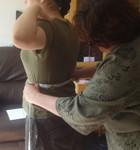
Find your centre back. There is a part of your spine where it turns from the cervical to the thoracic vertebrae and there is a large sticky-out bit, use that as your centre point and drop a line straight to your waist string and make a mark just like you did in the front. At this point, some may find that their spine may curve a bit. That’s OK, we will get to that. Measure the length from nape of neck to waist. Measure from underbust to waist (should be from the bottom of the your bra. (We will be measuring your underbust later. If at that time you notice that you bra is sliding up you back, as it often does, you will want to redo this measurement).

Find your side seams. Measure from the top of your armpit (really go right up in there – the rule of cloth is You Can Take It Off But You Can’t Put It Back On!) straight down to your waist string. Try not to lift your arm above shoulder height when you do this as it will distort the measurements. At this point you will begin to see that the left and right sides may be cms different. That’s just fine!
Measuring the waist. Normally we take waist front measurements from the front starting at one side seam to the other, then divide that number in half when drafting patterns. If your front is symmetrical, go ahead and do that. But if it is not, for instance one hip is higher than the other, then use the centre front mark on the waist string and measure from the Right side seam to the centre from and write that in the column provided (in PDF) and the same for the Left side. Again you can check you got it correct by measuring across the entire front and doing your sums.
Waist back. Here’s where it can be a bit tricky. Again if you are symmetrical measure the back at the waist string from side seam to side seam. But if you are not it is VASTLY important to each half separately!!! (yes! Multiple exclamation marks!!!) Non tailored backs cause quite a lot of problems with comfort!
Sorry, I don’t have a picture for this, but at this time I want to thank my DD (dear daughter) for posing for this set of pictures 8 years ago. Yes, it has taken me that long to get proverbial together to do this… She was the soul of patience. Although she did growl throughout the entire session. Those of you who know her, knows how very off-putting it can be.
Measuring the underbust. Do exactly what you did for the waist but under the bust.
Underbust back. Again the same as the waist making sure to take both sides individually if you are asymmetrical.
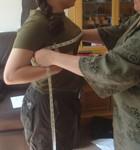
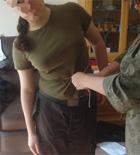
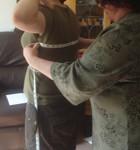
Here comes the FUN BIT! Measuring your bust. Please NOTICE in the picture that the “model” has grabbed both breasts and lifted them skywards! In fact, has made the breast height (fullest part) on the same line as her upper armpit. She is also holding the in the position she would expect the corset would hold them (i.e. together for 17th-19th century, same position for cupped corset, flattened for 20’s). Measure from side seam to side seam directly across the fullest part. If you are creating a cupped corset or your breasts are uneven, and this happens a LOT. Hold them in position and then measure each one individually from the side seam to the sternum BETWEEN the breasts, above the underbust. You still need a straight line here.

Again I don’t have individual images for the next few measurements. The next set you need are below the waist. Most people get confused between their waist and top hip (which is where the top of their jeans sit) and top hip and hip (widest point of bum). You will need to do for the following exactly what you did for your waist. Both front and back.
Find your top hip. It is usually where the waist band of your jeans sits. It can be almost at any point below your waist and is the widest point where your tummy bulges out (they all do so don’t be self conscious.) Measure:
- Front top hip
- Back top hip
- From your waist to your top hip
Find your hips. Take a measuring tape and at the widest part of your bum note the lateral line all the way around the body. This is approximately 9 inches below your waist – but isn’t always. Measure:
- Front hip
- Back hip
- From your waist to your hip
- from your side waist to your hip
This next one determines the dip of the corset, how long the point should be. There is nothing like a too short corset creating the “spare tire” syndrome. Mark where the top of your mons or pubic bone is. (See chart, or Google, or talk to your mum.) Measure from your waist to your pubic bone.
Optional measurements or for those doing over the shoulder corsets.

Shoulder measurements. Obviously, these are necessary for TudorBethan, 17c and other over the shoulder corsets. These next measurements are also helpful when drafting corsets if you are asymmetrical. Shoulder from neck to the pointy bit of bone at the end of the shoulder. Do NOT use sleeve seam lines as the straps will need to be ON your shoulder or it will give you no support. trust me those straps are not meant to slide off as the do in the movies.

There are two shoulder to back waist measurements you absolutely need. You can use the back to front shoulder seam on a t-shirt as a guide to where to put the tape on the top of the shoulder. Top of shoulder slope to waist. This is always necessary to do both sides as individual measurements. Lower shoulder slope (by arm joint) to waist. These are straight drops – NOT to centre back.

Front shoulder drop. Now you will usually drape this for fit but this will give you a guide of how much fabric you need. Use the same top seam where you did the back measurements. Don’t worry that the top will be in the middle of where you measured in the back. You will address this in the toile stage. Lift and position the breasts to the final desired corset position. From the top(ish) shoulder slope, do a straight drop measurement to the waist directly over the centre of the breast. Be sure not to raise your shoulder or shift your weight. Do both sides. Note: some patterns show the strap tying in or sitting almost under the armpit – this for any kind of corset you want to be able to eat, drink or dance in is WRONG. But it does give you an insight into social culture where you never lift a finger (because the clothes are so constricting you can’t) which explains the need for servants. To put the strap placement there is to become what we term “Gentry TRex”.
Download the PFD – corset measurements worksheet.pdf – for your records. You now have a metric f*ckton of measurements that you will really need in:
Part 2: Corset Fitting Part 2: The Good, the Bad and the Ugly.
1Shamefully nicked from Period Costume for Stage and Screen: 1500-1800: Patterns for Women’s Dress by Jean Hunnisett